Schedule > Tutorial 2. Practice with Parameters & Arguments
In this tutorial, you are going to design a customizable function that creates an image of Frankenstein (pictured left). The purpose of this exercise is to help you figure out how to use parameters and variables in order to make your ideas more flexible, customizable, and therefore more useful.
To do this, we’re going to walk you through a series of steps to begin trying to “think computationally” – i.e. finding places where code repeats and modularizing it using variables, functions, and parameters. We only have a few tools that are at our disposal right now, but just note that this code in this exercise can be further simplified in a few weeks when we learn more about loops.
In addition to gaining more practice with functions, there are three takeaways that we hope you will also get from this exercise:
- That programming is a process of formulating solutions over time (versus having everything all planned out at the very the beginning).
- That programmers are always trying to make their code efficient, readable, and succinct, which usually involves “refactoring” code so that it’s not repeating the same lines of code over and over again. This is known as the “DRY Principle” – “Don’t repeat yourself.”
- That programmers learn new techniques for solving problems by looking at examples of how other people have solved similar problems. Over time, you too will begin to develop a set of common strategies for solving classes of problems, and that comes by seeing lots of examples (and practicing).
Part 1: Understanding the “hardcoded” version of Frank
Please open the your_task.py file and take a look at it. Note that it is making use of the make_square function that you made in Tutorial 1.
body_color = '#5ec031'

# row 1
make_square(canvas, (50, 0), 25, fill_color='black')                 # pixel (3, 1)
make_square(canvas, (75, 0), 25, fill_color='black')                 # pixel (4, 1)
make_square(canvas, (100, 0), 25, fill_color='black')                # pixel (5, 1)
make_square(canvas, (125, 0), 25, fill_color='black')                # pixel (6, 1)
make_square(canvas, (150, 0), 25, fill_color='black')                # pixel (7, 1)

# row 2
make_square(canvas, (50, 25), 25, fill_color=body_color)             # pixel (3, 2)
make_square(canvas, (75, 25), 25, fill_color=body_color)             # pixel (4, 2)
make_square(canvas, (100, 25), 25, fill_color=body_color)            # pixel (5, 2)
make_square(canvas, (125, 25), 25, fill_color=body_color)            # pixel (6, 2)
make_square(canvas, (150, 25), 25, fill_color=body_color)            # pixel (7, 2)

# row 3
make_square(canvas, (50, 50), 25, fill_color=body_color)             # pixel (3, 3)
make_square(canvas, (75, 50), 25, fill_color=body_color)             # pixel (4, 3)
make_square(canvas, (100, 50), 25, fill_color=body_color)            # pixel (5, 3)
make_square(canvas, (125, 50), 25, fill_color=body_color)            # pixel (6, 3)
make_square(canvas, (150, 50), 25, fill_color=body_color)            # pixel (7, 3)

# row 4
make_square(canvas, (50, 75), 25, fill_color=body_color)             # pixel (3, 4)
make_square(canvas, (75, 75), 25, fill_color='black')                # pixel (4, 4)
make_square(canvas, (100, 75), 25, fill_color=body_color)            # pixel (5, 4)
make_square(canvas, (125, 75), 25, fill_color='black')               # pixel (6, 4)
make_square(canvas, (150, 75), 25, fill_color=body_color)            # pixel (7, 4)

...
Then run it using IDLE (or a code editor of your choice). You should see a picture of Frank (below).
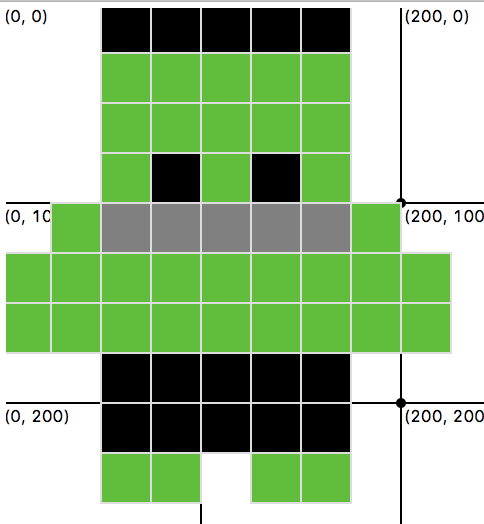
A few things to pay attention to in this file:
- This program will always draw a Frank that is the same size and positioned in the exact same place.
- Each “pixel” is 25 units wide / tall
- If you were to draw a box around this particular Frank, the top_left coordinate would be positioned at
(0, 0), and the bottom_right coordinate would be positioned at(225, 250).
Task 1: Manipulating Frank’s body and pants color
Try re-assigning a different color to the body_color variable, and running the program (note that Frank’s body color changes). When you’re done, please create another variable called pants_color, and edit the code so that the color of Frank’s pants is determined by the value stored inside the pants_color variable.
Task 2: Customize Frank’s size
Next, modify the code to make it easier to customize Frank’s size (i.e. the size of each pixel). As the program currently stands, each pixel is hardcoded to 25 pixels. But what if you wanted to draw a mini-Frank, or a really big Frank? You would have to update every x and y value.
To make this process more efficient, create another variable called pixel and assign the value 20 (int) to it. Then, figure out a way to use the pixel variable to make Frank’s size customizable. If you get stuck, see hints/hint_1.py. That said, don’t just copy this code…think about why it works (and ask questions).
Task 3: Customize Frank’s position
Next, modify the code to make it easier to customize Frank’s position. Note that the top-left corner of the Frank pixel map is positioned at (0, 0). In other words, the is an implicit offset of (0, 0). But you wanted to change this offet to, say, (100, 50), then you would have to manually add 100 to the value of every x-coordinate and 50 to the value of every y-coordinate.
To make this process more efficient, create another variable called top_left and assign the value (100, 50) (tuple) to it. Then, figure out a way to use the top_left variable to make Frank’s position customizable. If you get stuck, see hints/hint_2.py. Just like before, don’t just copy this code…think about why it works (and ask questions).
Task 4: Create a function so that you can instantiate many Franks
When you’re done, you have successfully made your Frank program customizable. However, if you wanted to make, say, 5 Franks, you would have to copy all of your code 5 times (and change the variables for each frank). This is inefficient. In general, any time you’re copying the same code over and over again, it makes sense to create a function. So, let’s make that happen. For your final task, please create a make_frank function that accepts the following arguments:
- canvas (Canvas): a tkinter Canvas object where you want the square to be drawn.
- top_left (tuple): a tuple – an point, an (x, y) coordinate – that defines the top-left position of the rectangle bounding your picture of Frank. The first element in the tuple refers to the x-coordinate and the second element in the tuple refers to the y-coordinate.
- pixel (int, optional): an int that specifies the width (and also height) of the pixel; defaults to 25.
- body_color (str, optional): a string that represents the Frank’s body color; defaults to a light green:
#5ec031. - pants_color (str, optional): a string that represents the Frank’s pants color; defaults to black:
#000000.
In other words, if I invoked your make_frank function as follows…
make_frank(canvas, (180, 220), pixel=20, body_color='#75B9BE')
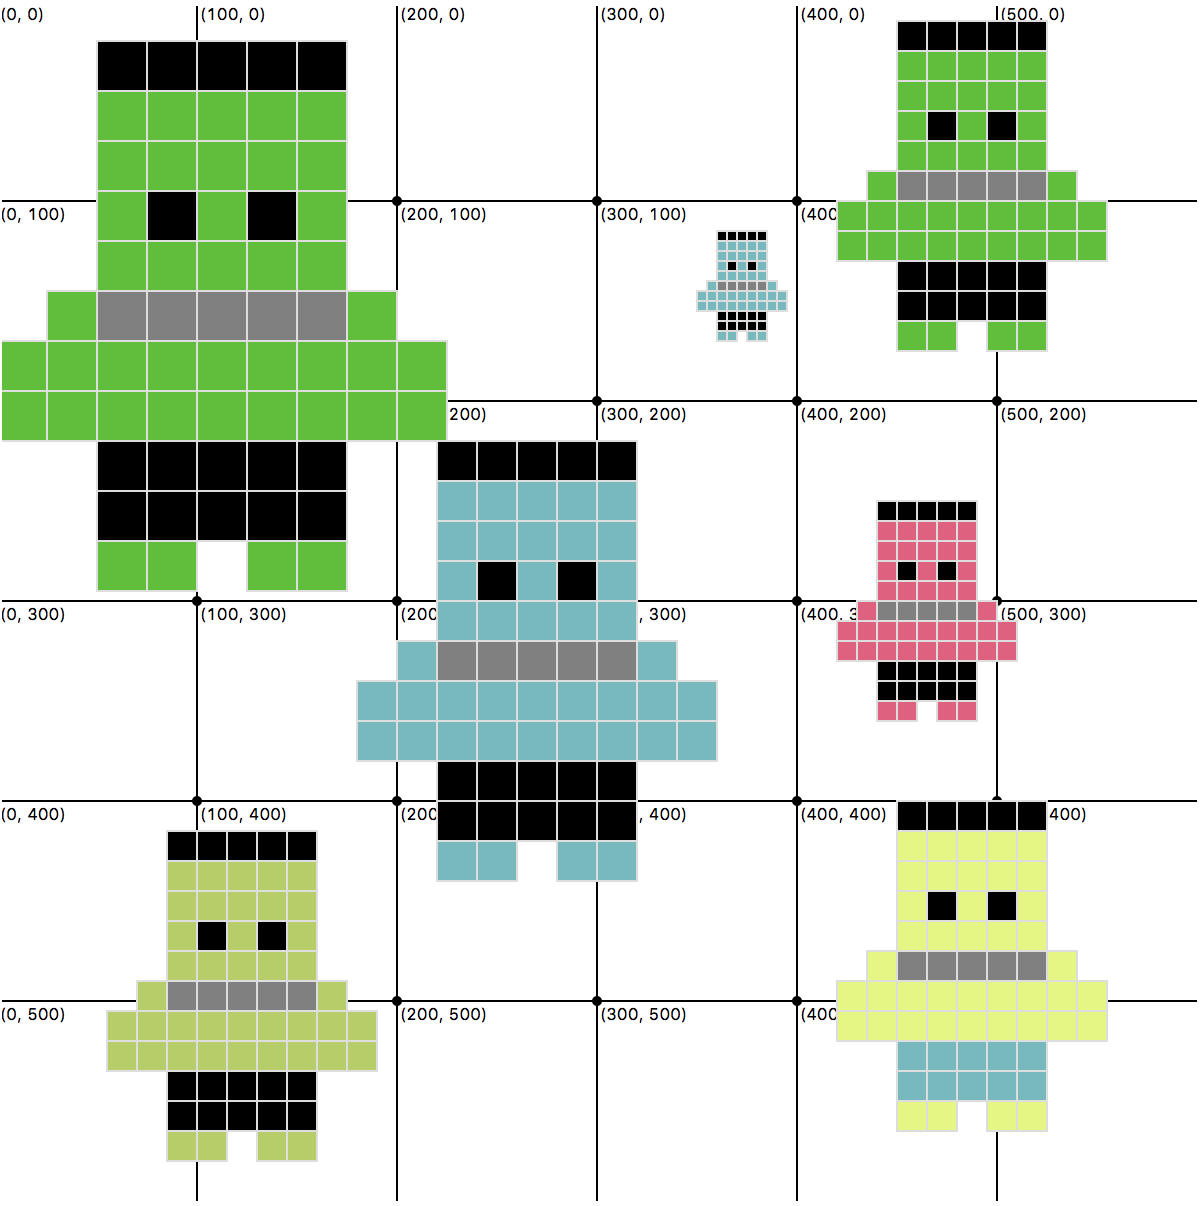
…your function would draw a blueish Frank with its top-left coordinate at position (180, 220), with a “pixel” size of 20, wearing black pants. After you’re done making your function, please uncomment the make_frank function calls at the bottom of your your_task.py file to test your code. If it works, you should see something similar to the image shown below.
# When we invoke your make_frank function, it should create the image
# shown below:
make_frank(canvas, (0, 20))
make_frank(canvas, (180, 220), pixel=20, body_color='#75B9BE')
make_frank(canvas, (420, 250), body_color='#E0607E', pixel=10)
make_frank(canvas, (55, 415), body_color='#B7CE63', pixel=15)
make_frank(canvas, (350, 115), pixel=5, body_color='#75B9BE')
make_frank(canvas, (420, 400), body_color='#E5F77D', pants_color='#75B9BE', pixel=15)
make_frank(canvas, (420, 10), pixel=15)
Optional Challenges
- Create a helper function called
make_rowto further simplify your make_frank function. Then, rather than repeating almost identical code for each row created, you will simply invokemake_row11 times (once for each row). - Create a second pixel art function that draws a different image. Google “pixel art simple” to get ideas.
- The pixel argument is kind of awkward. Arguably a better function design would allow the calling function to specify the width of Frank (as opposed to the individual pixels that comprise him). Therefore, modify the function header so that it requires a
width(int) parameter instead of apixelparameter. This change means that you will need to derive the appropriate size of the pixel based on the width and the number of columns needed to generate Frank (which is 9). When you’re done, update each of the function calls at the bottom of the file so that they pass in a width argument.
What to Turn In
As described in the syllabus, there are two ways to earn full participation credit in each tutorial session:
- By attending them (synchronously), working through the exercises, and asking questions (as they arise).
- By turning in the tutorial exercise(s) ON CANVAS before the tutorial session. Tutorial exercises will be posted at the beginning of the week (at least 48 hours in advance).
Whichever option you choose, you will be expected to know the material reviewed in the tutorial for the exam, and are encouraged to fully complete and submit the tutorial assignments (though this is not required if you attended the tutorial).