Schedule > Tutorial 1. Practice with Functions
This tutorial is based on content that is reviewed in Lessons 1-4, and is intended to prepare you for HW2. Please download the starter files and complete the instructions outlined below. PLEASE ASK LOTS OF QUESTIONS in your tutorial section. If you’ve never done this before, there are a lot of little typing / logic / conceptual mistakes that everyone makes. Tutorial is your time to allow yourself to make all of those mistakes so that you can learn from them.
LEARNING OBJECTIVES: In order to prepare you for this week’s homework, we wanted to use this tutorial session to go over a couple of important logistical and conceptual ideas.
- Making sure that TKinter is successfully running on your machine
- Creating functions
- Working with parameters & arguments
- Translating specifications into smaller steps that a computer can perform
Required: Square Challenge
Please open square_challenge.py in IDLE, which is located in the tutorial01 folder. Take a look at it and then run it. You should see something like this:
A. Create a “make_square” function
In the square_challenge.py file, write a function called make_square that accepts the following arguments:
- canvas (Canvas): a tkinter Canvas object where you want the square to be drawn.
- top_left (tuple): a tuple – an point, an (x, y) coordinate – that defines the top-left position of the square. The first element in the tuple refers to the x-coordinate and the second element in the tuple refers to the y-coordinate.
- width (int): an int that specifies the width (and also height) of the square.
- fill_color (str, optional): a string that represents the color of the square, defaults to a light blue:
#84A9C0.
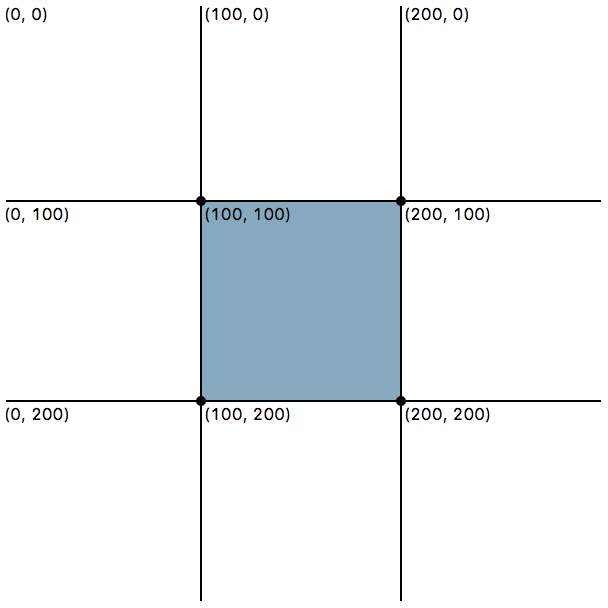
In other words, if I invoked your make_square function as follows…
make_square(canvas, (100, 100), 100, fill_color='#84A9C0')
…your function would draw a 100x100 blue square with its top-left coordinate at position (100, 100), as pictured above.
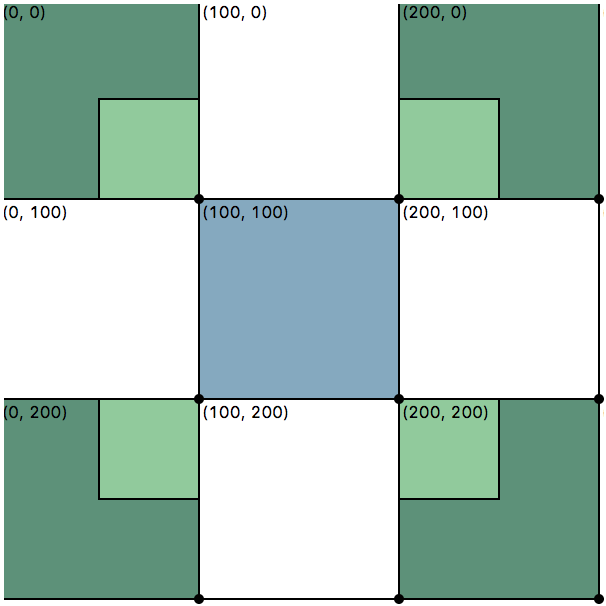
B. Use your “make_square” function to create the drawing pictured below
When you’ve finished with your make_square function, create the pattern pictured below by calling your function with the following arguments (below). Copy the following code and pasting it below your function definition, but above the helpers.make_grid(…) function:
# center blue block
make_square(canvas, (100, 100), 100)

# dark green blocks
make_square(canvas, (0, 0), 100, fill_color='#5B9279')
make_square(canvas, (200, 0), 100, fill_color='#5B9279')
make_square(canvas, (0, 200), 100, fill_color='#5B9279')
make_square(canvas, (200, 200), 100, fill_color='#5B9279')

# light green blocks
make_square(canvas, (50, 200), 50, fill_color='#8FCB9B')
make_square(canvas, (200, 200), 50, fill_color='#8FCB9B')
make_square(canvas, (50, 50), 50, fill_color='#8FCB9B')
make_square(canvas, (200, 50), 50, fill_color='#8FCB9B')
C. Use your “make_square” function to create your own drawing
Now, alter the code above to make your own drawing (anything that you can compose with squares). Feel free to alter the colors, positions, and sizes of your squares. Here is a link to a color generator (to browse different hexidecimal color codes, press the spacebar).
More Practice (If Time): Triangle Challenge
Please open triangle_challenge.py in IDLE (also located in the tutorial01 folder). Take a look at it and then run it. You should see something like this:
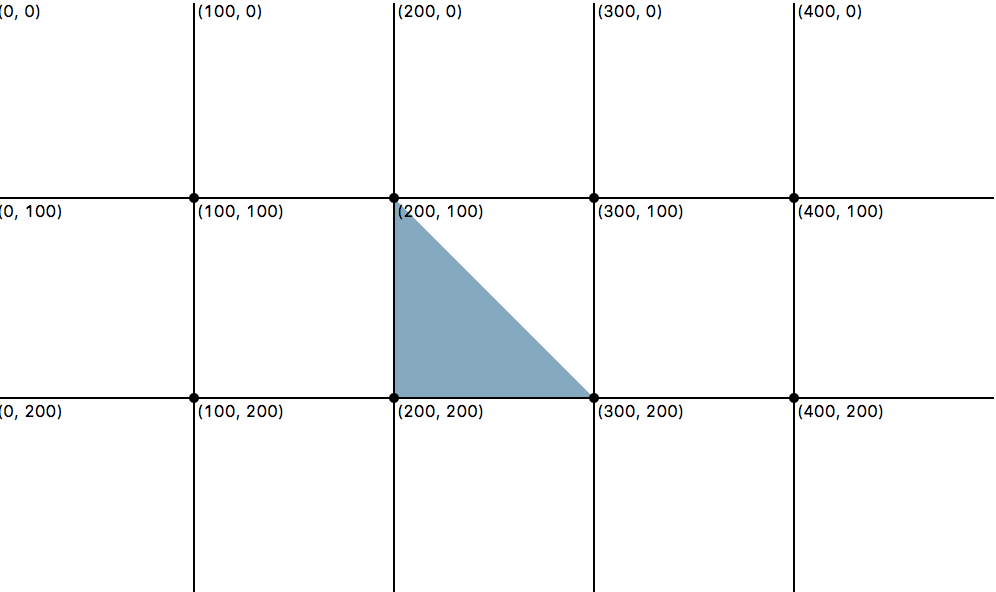
A. Create a “make_triangle_left” function
In the triangle_challenge.py file, create a function called make_triangle_left that draws a 45-45-90-degree right triangle, where the right angle is positioned at the bottom-left corner (as pictured above). It accepts the following arguments:
- canvas (Canvas): a tkinter Canvas object where you want the triangle to be drawn.
- bottom_left (tuple): a tuple – an point, an (x, y) coordinate – that defines the bottom-left position of the triangle. The first element in the tuple refers to the x-coordinate and the second element in the tuple refers to the y-coordinate.
- height (int): an int that specifies the height / length of the triangle.
- fill_color (str, optional): a string that represents the color of the triangle, defaults to a light blue:
#84A9C0.
B. Create a “make_triangle_right” function
Below the make_triangle_left function that you just made, create a function called make_triangle_right that draws a 45-45-90-degree right triangle, where the right angle is positioned at the bottom-right corner.
It accepts the following arguments:
- canvas (Canvas): a tkinter Canvas object where you want the triangle to be drawn.
- bottom_right (tuple): a tuple – an point, an (x, y) coordinate – that defines the bottom-left position of the triangle. The first element in the tuple refers to the x-coordinate and the second element in the tuple refers to the y-coordinate.
- height (int): an int that specifies the height / length of the triangle.
- fill_color (str, optional): a string that represents the color of the triangle, defaults to a light blue:
#84A9C0.
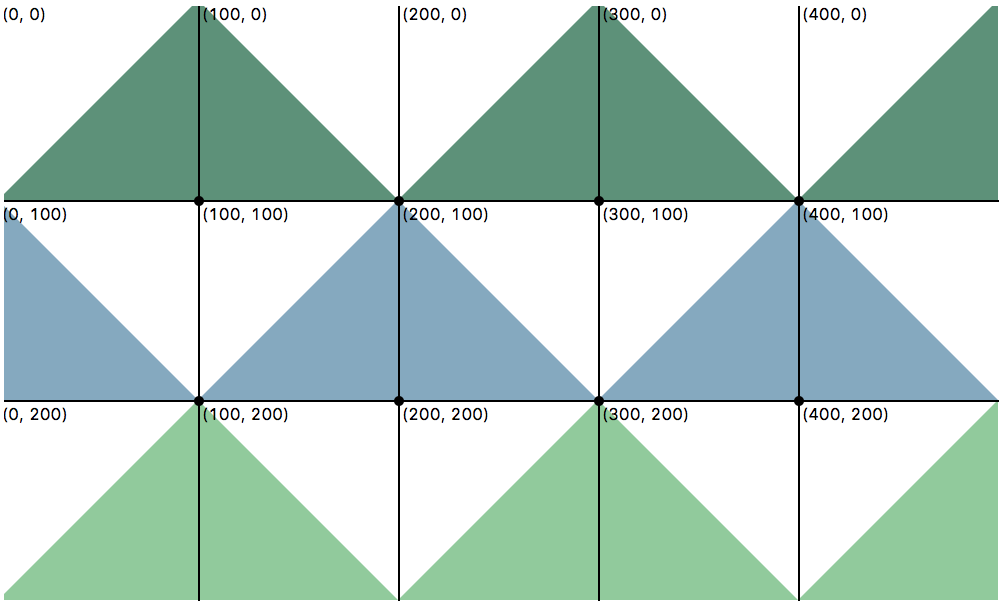
C. Use your “make_triangle_left” and “make_triangle_right” functions to create a drawing
When you’ve finished making your make_triangle_left and make_triangle_right functions, invoke these functions to create the pattern pictured below by copying the following code and pasting it below your function definition, but above the helpers.make_grid(…) function:
# row 1
make_triangle_right(canvas, (100, 100), 100, fill_color='#5B9279')
make_triangle_left(canvas, (100, 100), 100, fill_color='#5B9279')
make_triangle_right(canvas, (300, 100), 100, fill_color='#5B9279')
make_triangle_left(canvas, (300, 100), 100, fill_color='#5B9279')
make_triangle_right(canvas, (500, 100), 100, fill_color='#5B9279')

# row 2
make_triangle_left(canvas, (0, 200), 100)
make_triangle_right(canvas, (200, 200), 100)
make_triangle_left(canvas, (200, 200), 100)
make_triangle_right(canvas, (400, 200), 100)
make_triangle_left(canvas, (400, 200), 100)

# row 3
make_triangle_right(canvas, (100, 300), 100, fill_color='#8FCB9B')
make_triangle_left(canvas, (100, 300), 100, fill_color='#8FCB9B')
make_triangle_right(canvas, (300, 300), 100, fill_color='#8FCB9B')
make_triangle_left(canvas, (300, 300), 100, fill_color='#8FCB9B')
make_triangle_right(canvas, (500, 300), 100, fill_color='#8FCB9B')
What to Turn In
As described in the syllabus, there are two ways to earn full participation credit in each tutorial session:
- By attending them (synchronously), working through the exercises, and asking questions (as they arise).
- By turning in the tutorial exercise(s) ON CANVAS before the tutorial session. Tutorial exercises will be posted at the beginning of the week (at least 48 hours in advance).
Whichever option you choose, you will be expected to know the material reviewed in the tutorial for the exam, and are encouraged to fully complete and submit the tutorial assignments (though this is not required if you attended the tutorial).
Warning for Mac users: The TKinter bug
There is a known bug that happens on some newer MacOS laptops, that is described here.
You will know that you have this bug if you try to run one of the course Python files that makes use of the TKinter library (doing stuff with drawings), and your computer shuts down / logs out. If this bug happens to you, not to worry – there is a workaround. Here is what we suggest:
You will still EDIT your python files as you normally would in IDLE. And don’t forget to save. However instead of RUNNING your files in IDLE (don’t press F5), you will use the terminal. To run your python files in terminal:
1. Navigate to the directory where your files are stored
First, navigate to the diretory where your files are stored. If you don’t know how to do this, please refer to the course video in Lesson 3 called Demo: Working with the Command Line.
2. Execute the appropriate Python file using pythonw
Once you’re in the correct directory, please execute your file by typing:
$ pythonw your_file.py
Note the “w”: pythonw instead of python. Please ask your TA if you have any questions about this and they can help you.