Assignments > HW2: Intro to Tkinter
Due on Tue, 04/21 @ 11:59PM. 8 Points.
LEARNING OBJECTIVES:
- Practice working with Python modules, including reading documentation
- Practice writing your own functions
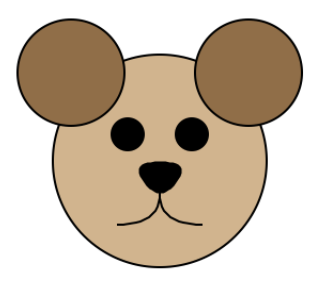 In this assignment, you are going to get some practice writing functions using tkinter that will ultimately enable you to create more complex shapes (like animals, trees, plants, etc.). To do this, we will be using a built-in python module: tkinter. Tkinter provides support for creating custom graphical user interfaces (GUIs). I created the buddy to the right using 5 circles, one polygon, and two lines (8 shapes total) in tkinter. Please download the homework starter files (above).
1. Background Information
Coordinate system
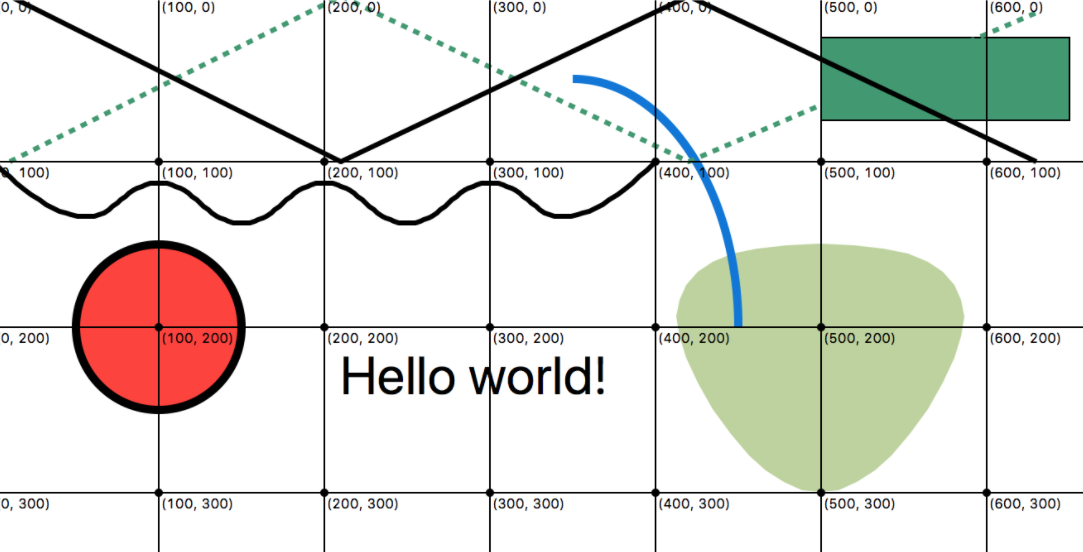
To draw your shapes, you will be using an (x, y) coordinate space that has a different origin from the one you use in math class. For computer graphics, the origin is typically in the top left-hand corner (pictured below). To help you debug, I have created a function, make_grid, in the helpers.py file, that will draw gridlines for you.

Source: https://processing.org/tutorials/drawing/
TKinter sample code
To get you started, I have created a file of samples, located in warm_up.py, that you can use as a reference as you learn how to draw shapes using the tkinter canvas library. Please feel free to copy and adapt code from this file to complete your assignment. When you run warm_up.py from IDLE (by pressing F5), you should see an image like this:
main.py (file you will be editing)
In main.py, there will be some initialization code at the top of each file, which imports the Canvas and Tk modules (belonging to the tkinter module) and initializes the window and the canvas. There will also be a ‘drawing loop’ at the end of each file that will actually render your drawing. Don’t worry about any of this code for now: just take it as a given. You will understand it more in the coming weeks and months. You will add your code in between the commented lines (as specified in the figure below).
from tkinter import Canvas, Tk
from helpers import make_grid

gui = Tk()
gui.title('Shapes')
c = Canvas(gui, width=700, height=700, background='white')
c.pack()
########################## YOUR CODE BELOW THIS LINE ##############################

## All of your code will go in between these two lines:

########################## YOUR CODE ABOVE THIS LINE ##############################
canvas.mainloop()
Documentation
- Finally, you may need to refer to the canvas documentation, located here: http://effbot.org/tkinterbook/canvas.htm. Most technical documentation is terse and difficult for beginners to interpret. That said, learning to read technical documentation is an important part of becoming a solid programmer, and will serve you well. You are essentially learning to read in a new genre, so interpreting the documentation takes practice (and patience). Ultimately, learning about tkinter is unimportant. However, learning how to work with modules (which all have structures similar to tkinter) is one of the most important things you will learn in the class.
2. Your Tasks
Take a look at some of the canvas functions and feel free to tinker with the arguments and values of the code. When you’re done, please complete the following 4 tasks:
1. Modify the make_oval function
The job of the make_oval function is to draw an oval to the canvas, centered at a given center point, according to a given x-radius and y-radius (as specified by the arguments). We are creating this function because in the existing tkinter function, create_oval, is not intuitive: specifying the top-left and bottom-right coordinates of an oval is unconventional and inconvenient. The make_oval function accepts the following arguments:
- canvas (Canvas): a tkinter Canvas object where you want the oval to be drawn.
- center (tuple): a tuple that defines the center point, an (x, y) coordinate, where the first element in the tuple refers to the x-coordinate and the second element in the tuple refers to the y-coordinate.
- radius_x (int): an int that specifies the radius of the oval in the x-direction.
- radius_y (int): an int that specifies the radius of the oval in the y-direction.
- fill (str, optional): a string that represents the color of the oval, defaults to hot pink.
Your job: Currently, the create_oval function draws a hard-coded oval with a top-left coordinate of (100, 100), and a bottom-right coordinate of (200, 150) — which effectively draws it at a centerpoint of (150, 125), with an x-radius of 50 and a y-radius of 25. Your job is to modify the code so that the top-left (x, y) and bottom-right (x, y) coordinates are calculated based on the radius_x, radius_y and center point specified by the arguments; and that the fill color is determined by the fill argument.
2. Modify the make_circle function
The job of the make_circle function is to draw a circle to the canvas, centered at the given center, and with the given radius. We are creating this function as a convenience function. The function accepts the following arguments:
- canvas (Canvas): a tkinter Canvas object where you want the circle to be drawn.
- center (tuple): a tuple that defines the center point, an (x, y) coordinate, where the first element in the tuple refers to the x-coordinate and the second element in the tuple refers to the y-coordinate.
- radius (int): an int that specifies the radius of the circle.
- fill (str, optional): a string that represents the color of the circle, defaults to hot pink.
Your job: Currently, this function creates a hard-coded circle with a top-left coordinate of (300, 100), and a bottom-right coordinate of (400, 200) — which effectively draws it at a centerpoint of (350, 150), with a radius of 50. Your job is to modify the code so that the top-left (x, y) and bottom-right (x, y), and fill color are determined by the arguments passed into the function.
HINT: you may do this by calling the make_oval function that you just made in exercise 1.
3. Modify the make_face function
The job of the make_face function is to draw a face (i.e. a circle) with two eyes (i.e. ovals) to the canvas, according to the center point and width specified by the arguments. The function accepts the following arguments:
- canvas (Canvas): a Canvas object where you want the oval to be drawn.
- center (tuple): a tuple that defines the center point, where the first element in the tuple refers to the x-coordinate and the second element in the tuple refers to the y-coordinate.
- width (int): an int that specifies the width of the face.
Your job: Your job is to use the make_circle and make_oval functions that you’ve just created to draw a face. The face should be a circle, and it should have 2 oval eyes (see screenshot below). The eyes should scale with the width of the face.
4. Modify the make_bullseye function
The job of the make_bullseye function is to draw a bullseye of 4 concentric circles to the canvas, centered at center. The smallest concentric circle will have a radius of radius (value of the argument), and each additional concentric circle will have a radius of distance units more than the previous circle. For instance, if radius=10 and distance=5, then the first circle has a radius of 10, the second a radius of 15, the third 20, and the fourth 25. The function accepts the following arguments:
- canvas(Canvas) : a Canvas object where you want the oval to be drawn.
- center (tuple) : a tuple that defines the center point, where the first element in the tuple refers to the y-coordinate.
- radius (int) : an int that specifies the radius of the circle.
- distance (int) : an int that represents how far apart each circle should be drawn.
Your job: Your job is to use the make_circle function that you just created to draw a bullseye (with 4 concentric circles of different colors — you choose the colors).
HINT: you’ll have to draw the biggest circle first, or else your big circle will overwrite (occlue) the smaller circles.
Testing
When you’re done, your program should draw this image that looks similar to this one (feel free to use whatever colors you want for the bullseye):
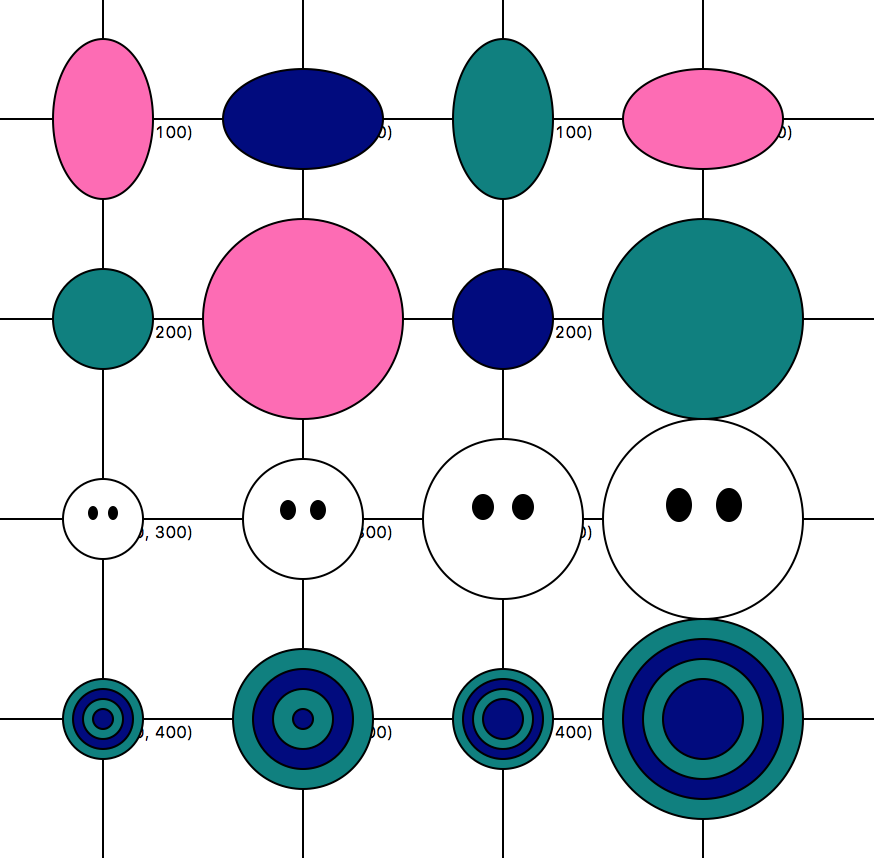
Here is how I will call your functions:
##################################
# HOW I WILL CALL YOUR FUNCTIONS #
##################################
# Exercise 1: ovals:
print('Exercise 1...')
make_oval(canvas, (100, 100), 25, 40)
make_oval(canvas, (200, 100), 40, 25, fill='navy')
make_oval(canvas, (300, 100), 25, 40, fill='teal')
make_oval(canvas, (400, 100), 40, 25)

# Exercise 2: circles:
print('Exercise 2...')
make_circle(canvas, (100, 200), 25, fill='teal')
make_circle(canvas, (200, 200), 50)
make_circle(canvas, (300, 200), 25, fill='navy')
make_circle(canvas, (400, 200), 50, fill='teal')

# Exercise 3: faces:
print('Exercise 3...')
make_face(canvas, (100, 300), 40)
make_face(canvas, (200, 300), 60)
make_face(canvas, (300, 300), 80)
make_face(canvas, (400, 300), 100)

# Exercise 4: bullseye:
print('Exercise 4...')
make_bullseye(canvas, (100, 400), 5, distance=5)
make_bullseye(canvas, (200, 400), 5, distance=10)
make_bullseye(canvas, (300, 400), 10, distance=5)
make_bullseye(canvas, (400, 400), 20, distance=10)
3. What to Submit
Please zip the entire hw02 folder and name the zip file hw02.zip. We will only be grading your main.py file, but since there are dependencies, we would like you to submit all of the files together via a zip file.
4. Warning for Mac users: The TKinter bug
There is a known bug that happens on some newer MacOS laptops, that is described here.
You will know that you have this bug if you try to run one of the course Python files that makes use of the TKinter library (doing stuff with drawings), and your computer shuts down / logs out. If this bug happens to you, not to worry – there is a workaround. Here is what we suggest:
You will still EDIT your python files as you normally would in IDLE. And don’t forget to save. However instead of RUNNING your files in IDLE (don’t press F5), you will use the terminal. To run your python files in terminal:
1. Navigate to the directory where your files are stored
First, navigate to the diretory where your files are stored. If you don’t know how to do this, please refer to the course video in Lesson 3 called Demo: Working with the Command Line.
2. Execute the appropriate Python file using pythonw
Once you’re in the correct directory, please execute your file by typing:
$ pythonw your_file.py
Note the “w”: pythonw instead of python. Please ask your TA if you have any questions about this and they can help you.